Home Blog Page 29

The Best Oculus Travel Cases

0

Transporting your Oculus Rift along with all the accompanying equipment isn’t as easy at it may initially seem. If you have the Oculus rig at home, you are probably aware it takes some time to set the whole thing up. Many of us, however, tend to travel often, for whichever purpose – business or pleasure. Fortunately, there are plenty of Oculus travel cases suitable for individuals with more on-the-road oriented lifestyles.

So, what makes a good Oculus travel case? There are several factors to consider, but above all you want to make sure that your Rift remains undamaged during transport – protected at all times!

If you already have to travel a lot, or you just simply enjoy it, and want to bring your Oculus Rift with you, you might as well do it in style! Let’s take a look at VRBorg’s list of some the best Oculus travel cases!

The Pragmatist

Well… at least you won’t pay extra!

Yeah, you can use the shipment box the Rift came in with as your Oculus travel case. However, it isn’t by any means the most stylish of solutions. The thing is, since the release of Oculus Rift DK2, the rig comes in a cardboard box, which in all honesty feels and looks very cheap. Its a cardboard box with a handle – that’s it.

DK2 (left) and DK1 (right) shipment boxes

We understand that the goal was to reduce the manufacturing costs of DK2 as much as possible, but seriously, it is just disgusting, and I, personally, don’t want to be carrying anything in it. However, if you’ve purchased the DK1 version, you got it in an aesthetically pleasing plastic casing, which serves the purpose of Oculus travel case perfectly.

Hyperkin Polygon VR Protector Bag

Here is something that will make you feel more comfortable carrying your Rift around. The grid foam ensures your Oculus headset remains safe. Modular compartments offer plenty of space for the headset and all the equipment. The dimensions are circa 12″ X 13″ X 6″, so this Oculus travel case from Hyperkin is decently compact. The extra protective padding ensures that accidental impacts or blows won’t cause any damage to your Rift. It comes with a 4 ft. adjustable shoulder strap.

Check out Hyperkin Polygon VR Protector Bag on Amazon

USA GEAR S7 Pro Oculus Travel Case

USA GEAR came up with the Oculus travel case solution which resembles the standard laptop bag look. However it is a bit more bulky than the regular laptop travel case with the internal dimensions of 11.5 x 8.5 x 4 inches. It also features modular compartments – so called FlexWall organization. Essentially, you are able to reconfigure the interior in the way that best suits your needs.

The build quality is fairly decent. The bag is compact and lightweight, and the interior lining is made from scratch resistant materials, ensuring your Rift doesn’t suffer from all that carrying around. The exterior shell is heavy duty padded and weather resistant, so this Oculus travel case provides an all-around protection.

Check out USA Gear Oculus Rift Carrying Case on Amazon

Navitech Rugged Gray Oculus Travel Case

Navitech comes up with a backpack Oculus travel case solution. Built from unique poly-fiber materials, it provides heavy-duty protection, yet retains the uniform and sleek design. Of all aforementioned Oculus travel cases, this one seems like the best grab&go solution. The build quality is solid, the price is affordable, the design is aesthetically pleasing, compact, and yet everything fits inside! What else is there to say?

Click here to check Navitech Oculus travel case

Pelican Oculus Travel Case by Base Reality

Pelican has been known for producing heavy duty suitcases for quite a while. When someone sees you with the Pelican Oculus travel case from afar, they’ll probably think that you are carrying some REALLY important evidence or documents inside it!

Base Reality adapted the Pelican’s suitcase, and it is now the ultimate Oculus travel case. The only downside is the excessively high price, which starts at around $300. Bad news, I know… It does however look really bad-ass!

Get Pelican Oculus travel case on Amazon


We hope that our list of best Oculus travel cases helped you pick out just the right one for you!

Sincerely Yours, VRBorg Collective

The Best Lens Protectors for the PSVR

0

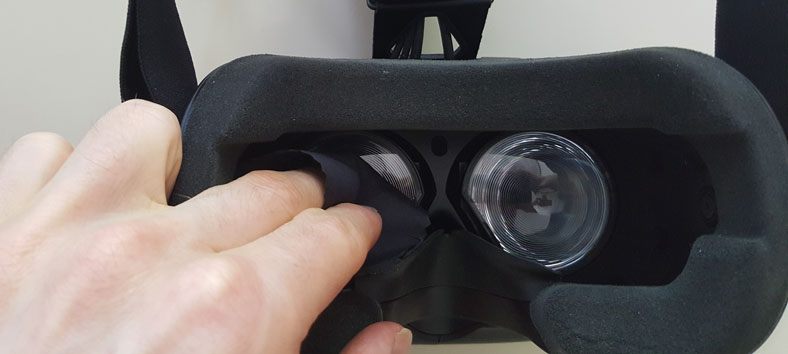
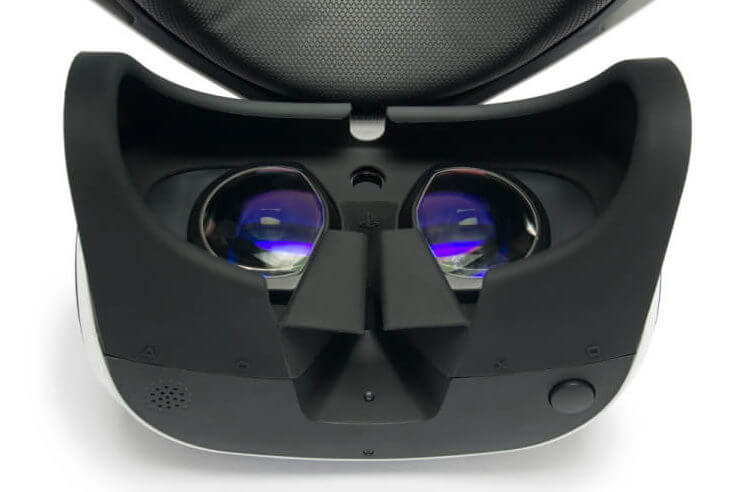
Something as simple as getting the print of one of your fingers on a lens of your PSVR headset can cause blurred vision in VR, and completely ruin the immersion of your VR experience. You could easily touch your lenses if you reach into the headset to scratch an itch, or to adjust a flap inside the headset. If you do get a print on a lens, that involves removing the headset and cleaning it out, and that itself carries with it the risk of scratching the lenses.

While the PlayStation VR does provide you with a cloth to clean the lenses with, just about any reasonably soft and lint-free cloth will suffice for this. You need to avoid putting liquid on the lenses, or use paper or anything rough to clean the lenses. This applies equally to the lenses of the camera as to the lenses for the eyes. Be very careful of particles on the lenses, as they could potentially scratch the lenses. A good lens protector could protect your headset’s lenses from dirt and grime…

Here’s a good PSVR lens protector

psvr lens protectors

Wearing eyeglasses is necessary in VR – if you need them, of course

The PlayStation VR is designed to fit glasses. And if you thought you might not need them, because the screen is technically closer, that’s not the case at all.

Sony’s virtual reality headset simulates an image that is away from your eyes, despite the nearness of the screen. If you don’t wear your glasses with your VR headset, you will have the same vision issues as you would when viewing any object that is far away.

Adjust the headset and headphones so that your glasses do NOT touch the lenses, nor should the headset force the glasses on your nose: your experience of VR might otherwise become rather painful.

Wearing eyeglasses while playing is the greatest threat to the lenses

If you wear glasses, and play active games, your glasses can make regular contact with the lenses of the headset. While glass is an extremely hard substance, and not many other substances can scratch it, glass scratches glass easily. After a few active games wearing glasses, you may find that your PSVR lenses are badly scratched. And that’s bad news.

Remember that the lenses of the PSVR are glued in place, so if you scratch them, it’s not just a question of unscrewing the old lenses and putting in new ones. No, you’ll have to take the PSVR headset down to the Sony service center, and they’ll charge you a flat fee of a hundred and fifty dollars to fix the problem. That’s quite a price to pay for what should have been a simple lens change.

This is really not very consumer-friendly of Sony, obviously. It would have been just as easy to have lenses that screw out. Consumers could purchase fairly cheap replacements if they get scratched, and screw in those replacements themselves. Unfortunately with the lenses being glued in place, any thought of replacing them outside of a service center is quite unrealistic, especially as no replacement lenses are even available.


That brings us to lens protectors

If you can’t replace the lenses, what you can do is protect them before they get scratched. There are quite a few lens protectors on the market, and installing one of them will ensure that your PSVR headset does not require a $150 maintenance procedure in the near future.

Hyperkin lens protectors

Hyperkin lens protectors are easily available and effective. However, they can be a bit of a problem to get into place. Once you do, you can rest assured that the lenses of your PSVR headset are safe from damage. Best of all, your vision in VR is just as clear as before, with no interference from the lens protectors. A pair we tested worked well without issues for half a year.

They are worth it, because it’s quite easy to get the lenses scratched even if you’re very careful when you use the PSVR headset. For example, you might lend it to someone with glasses, and they might scratch the lenses without even realizing that they can be scratched. With the Hyperkin lens protectors in place, one never has to worry about something like that.

Hyperkin Lens Protectors

How easy are they to put on?

Experiences vary greatly. From what we’ve heard, they can be anything from effortless to get on, to a great deal of trouble. We’ve never heard of a case where a user failed to get them on, though. The company sends you spares along with your purchase, so even if you fail to get one pair on, you can just try again.

Before we tried to get the lens covers on, we first made sure that the PSVR lenses were perfectly clean and clear. While the visual clarity in VR is excellent with these protectors in place, it’s nice if you own a lens pen, as this is really the best way to clean them. You’ll also need to clean the lenses of the PSVR, as well as give the protectors themselves a ‘once over’ before you install them, to make sure that no particles or grime are caught between the actual lenses and the lens protectors, once they are in place.

Here’s one of the best lens pen products

Fitting on the first lens cover was a little troublesome, since the ring of a rubber that surrounds it was slightly out of place when we got it on. We can blame that on our lack of experience. Actually, we don’t think this slight placement issue with the outside ring would have been visible once the headset was on, but we removed the cover with the tool provided with the lens covers, and then adjusted the outer ring a bit before putting the lens cover on again. This time we ensured that the side where we’d had an issue went in first. The lens cover went on perfectly. It was time to put on the second one.

This one went on without the slightest problem, and the result with both the protectors in place gave no cause for complaint. And the visual experience in VR was perfect.

Easier to clean

The lens covers seem to be much easier to clean than the original lenses of the PSVR. Grease doesn’t seem to build up along the edges, and the covers themselves are designed so you can clean them completely. Shipping can be a trifle slow, since they come in from Thailand. Mostly, the lens covers should arrive within ten days. We had to pay no extra taxes on this item, though that can vary from country to country, of course.

Click here for the best Hyperkin VR Lens Protector deals


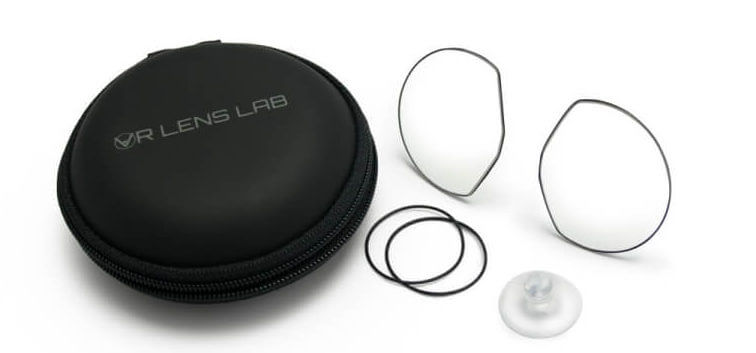
Lens Lab lens protectors

Made of strong polycarbonate material, these lens protectors are easy to put into place, and they work reasonably well to protect your lenses.

These protectors also have a special coating that works to screen out the lowest spectrum of blue light from the display, which has been proven to be harmful. This special coating also works to increase contrast, and the sharpness and clarity of your VR experience. This makes virtual reality considerably more immersive. These lens protectors also resist both static and liquids, which makes them much easier to clean than the original lenses of the PSVR headset.

These protectors come with a special tool that allows them to be removed easily, as well as extra outer rings to seat the lenses on. There’s also a case to hold all this.

Lens Lab PSVR lens protector

Installation

Installation is really quite easy, though you may make mistakes the first time around. The Lens Lab protectors do require a special technique to push into place, and that’s a learning experience in itself. Not a particularly difficult learning experience, but you probably won’t get it right the first time. Don’t worry, it becomes much easier once you’ve done it once or twice.

All you have to do is put the lens protector in place so that it is in line with the lens, and push it on, with the force applied as evenly as possible. Sometimes, when you do this, a portion of the outer ring may show a bit, but this is invisible in VR, and what’s really important is that the lens protector fits in place tightly.

One could push harder in an effort to push that outer ring completely in place as well, but we chose not to do so as we didn’t wish to risk damaging the PSVR’s lenses themselves. It really would be rather too ironic if we were to break the PSVR’s lenses while installing something designed to protect them. There’s a nice demonstration movie on the company’s website, and all you have to do is follow it, to get the protectors in place. We’ve used these protectors for about two months or so, and they’re still in perfect condition, and so are the PSVR’s lenses.

Find out the best deals on Amazon

How to Clean VR Lenses

0

Every virtual reality headset available today shares one important bit of hardware – the lenses that direct light from the VR screens to your eyes, thus creating a virtual world in front of your eyes. Lenses are a crucial component of a VR headset since it is through them that we perceive virtual reality.

This also means that the immersion offered by any VR headset can be ruined if the lenses are dirty. This can especially be the case if you share your VR headset with acquaintances. Learning to clean the lenses of your VR headset is an important portion of maintaining your link with virtual reality.

When initial versions of the Oculus Rift first came out, many people who bought the headset scratched the lenses by trying to clean them with a rough rag. A pack of moistened wipes works well, and if you’d like something that is truly effective, we suggest Carl Zeiss cleansing wipes.

Get Carl Zeiss wipes on Amazon

How to clean VR lenses

It is essential to clear the lenses of your headset of debris that accumulates over time. Dust and hair can considerably interfere with your VR experience, but could also trouble the eyes, trigger allergies, and cause other problems. The most effective way to keep the headset’s lenses clean without damaging them is through the use of compressed air, followed by a wipe down with a microfiber cloth.

clean vr lens

You’ll need to place the nozzle of your compressed air container a short distance from a lens, and give it a short burst. This makes it easy to remove small dust particles. Then, with a micro fiber cloth, gently wipe the lens to remove any last residue. Your lens will be absolutely clear again and ready for use.

Cleaning the cushions and face pads

What many people who concentrate on cleaning the lenses of a VR headset do not realize is that a lot of the grime that collects on the foam face pads can easily transfer on to the lenses. This is not only because of the proximity of the face pads to the lenses, but because the face pad naturally collects a great deal of sweat and dirt.

The best way to prevent issues here is actually to wear a sanitary mask when you use the headset. The mask will absorb most of the sweat and grime that tends to build up where the pads make contact with the skin, and it can easily be machine-washed, unlike a headset.

You can also wash the face pads, with a certain level of caution, of course. Alternatively, you could just wipe them down with a wipe that has an antibacterial agent, and you’ll be good to go. Let it dry, and your headset will be ready to use again.

Find disinfecting wipes on Amazon

Cleaning the inside of the headset

If you don’t keep the inside of your headset clean, no amount of cleaning the lenses will keep them free of dirt, as it will continually transfer from the inside of your headset to the lenses. A simple, dry microfiber cloth really works best here. Don’t let moisture get inside the headset, as this can cause damage to it when it is operational. In any case, you should ensure that the entire unit is completely dry before you use it next.

That’s all it takes to keep VR lenses clean. Yes, it’s a bit of maintenance you hadn’t counted on when you first bought your headset. But in the long run, doing this will maintain the clarity of your virtual or mixed reality experience.

Top Places to Visit in Google Earth VR

We live on a beautiful planet, and the number of places one could visit on it are certainly more than anyone could cover in a single lifetime. However, it’s only the lucky few who can manage their finances well enough to make a regular thing of globetrotting. And even these will only be able to visit a small number of the possible destinations on this incredibly diverse planet.

Yet it has suddenly become possible to see… everything

Suddenly you can travel anywhere on the planet, whenever you wish you, irrespective of time, finances, or even the weather. Walk in the metropolises of the globe, look out over the Grand Canyon, or even take a trip into orbit, all in one afternoon.

Google Earth VR, the new ‘hyperspaced’ version of the old Google Earth, makes all this possible. So raise the curtain on a new avatar of an old program, and an extremely impressive application of augmented reality.

But don’t take our word for it. See for yourself…

A decades-long journey into the future…

Google Earth was created seven years in the past, merely as an intuitive tool to help people find their way around our planet. However, in the last decade, it has been downloaded an incredible two billion times. No other related application can even come close to the widespread use Google Earth enjoys today.

Google Earth VR is just a step onward from that

It was developed in secret for four years before being launched, and adds a whole new dimension to what is, essentially, an old system. The head of the project is Dominik Kaeser, and he says that it was what Google calls a ‘twenty percent’ project. That is to say, it was a project of the sort that Google encourages employees to take on, on a secondary basis, that may be of use to the company at some point in the future.

But it’s not just Google Earth ported to virtual reality

Not at all. Google Earth VR is an experience in its own right. The ergonomics have been totally revised, and the interactions with the application redesigned. Indeed, Google Earth VR offers, among other things, flight as the preferred mode of travel between destinations.

It’s a bird. It’s a plane. No, it’s just an ordinary citizen… flying in VR.

Let’s choose a random location on the planet, and fly there. Here’s Manhattan…

Ah, too many skyscrapers? Perhaps one of the older cities on this planet would be more to your taste. So here’s Rome…

Don’t forget to focus on the Colosseum while you’re there. Or on any of the other glorious landmarks this city has to offer.

places to visit in vr

And if exquisite interiors and architecture interest you, may we suggest the Palace of the Sun King in Versailles, in France, relic of another, more decadent – yet definitely more artistic – time.

visit in vr Versailles

Or how about the wondrous city of Florence?

florence

Do you believe that human glories pale before nature?

If so, a visit to the Great Barrier Reef near Heron Island would prove your point. Yes, the barrier reef has been mapped by Google Earth VR, and you can actually visit and explore certain sections of it.

great barrier reed

And you can follow that up with a visit to Switzerland’s exquisite Alps. We’ve done this, and it’s definitely worth experiencing. You can follow mountain rivers up from blue green lakes, as they circle through quaint valleys with little towns and villages, to finally end at some mighty dam high in the mountains.

swiss alps

If you’re feeling more austere, how about a trip to the base camp of the proudest mountain on the planet, Everest…

base camp everest

A walk around the crossroads of Shibuya in Tokyo should certainly be on your list, or exploring the glories of America’s Rocky Mountains.

Or, if your taste leads you to the historic roots of humanity, we suggest the Céide Fields in Mayo County in Ireland, where you can see Stone Age relics from humanity’s past.

Ceide Fields in Mayo County

The possibilities, fellow humans, are really endless…

Google Earth VR: The largest library of VR content… created by accident

It all started when Kaeser began to understand that Google Earth’s accumulated data from almost a decade could eventually be combined with virtual reality technologies into an unprecedented experience. Google had, in effect, accidentally created the most massive library of VR content on earth. Google now has a full-fledged team working on Google Earth VR.

The project offers more than 510 million square kilometers, allowing one to see 94% of the planetary landmass in glorious 360 degree vision, in 175 cities and an excess of 600 urban areas. Here’s a video that shows you more of what exploration in Google Earth is like…

But you’re mistaken if you think that Google Earth is limited to ‘earth’. Google has made special efforts to include, for example, the moon…

The experience also offers several modes

One can either go for a walk, or select places on a list or even access guides in prime locales via the “TOURS” option. I’ll come back to this a little later. By default, a comfort mode reduces the field of vision during the ‘flight’ to avoid “motion sickness” (feelings of nausea) associated with virtual reality. You are free to activate or deactivate this mode. Google Earth VR is already available for a range of VR headsets.

Guided tours

You can, of course, explore different locations on the planet intuitively, and at will, especially as Google has provided you with the ability to actually fly across the planet, or even ‘fly in’ from space. But for the more traditionally minded, the company offers detailed guided tours of special locations.

Additions planned to the app will allow it to even interact with users in future, allowing a whole new dimension to ‘virtual travel’ that would allow people to not only to explore their world, but to also ‘save’ their visits to different places, and share them with friends.

There’s a vast different between reading about Paris, or watching a video of it, and actually exploring its streets in virtual reality. Google Earth VR has allowed humanity to take a giant step into tomorrow… today.

NOON VR Headset Review

0

The NOON Virtual Reality Headset is a crucial step up from the skew of basic mobile based headsets on the market today. I might point out that the NOON is not integrally a gaming headset, but it nevertheless presents a user with many interesting possibilities that other headsets do not. For example, sight based controls allow for intuitive and effortless viewing of 3D movies. There are also attached apps that can convert conventional video into movies that can be used with the NOON VR headset.

The specifications of the NOON VR headset

The headset provides a field of view of around 120 degrees and has gyroscopic sensors. It also has a special tap control. The manufacturer claims that the lenses use a special technology that prevents fatigue to the eyes. The lenses are also supposed to be scratch resistant, which is especially good news, as scratches to the lenses can really ruin your VR experience. Apps included with the device can be used to stream the active app from a PC to the headset. This means that many PC games can be effortlessly streamed to the NOON VR headset. This feature also allows the headset to be used as an alternate to a monitor display. The streaming app is compatible with both OS X and with Windows.


Pros and Cons

Here are some of the advantages and disadvantages of the Noon VR headset.

Pros

  • The built-in apps allow direct streaming off the PC desktop to the headset.
  • The apps can convert your movie clips to VR compatible videos.
  • The headset has a futuristic design and incorporates a touch screen in the front for easy control.
  • The lenses are extremely scratch resistant and specially designed to reduce fatigue to the eyes.
  • Finally, the headset has been designed to fit a large variety of mobiles.

Cons

  • One of the most important negative points is that the headset does not support mobile devices that run Windows as an operating system.
  • Each headset can also link to a rather small range of devices.
  • Finally, the headset does not seem to support Linux.

Check out the best NOON VR PRO deals


Using the NOON VR headset

The NOON VR headset is rather unique in that it actually has an authentication process before you use the headset. This is done through an integrated app that allows you to utilize the headset. Each headset has its own activation code, and this is printed on the manual that accompanies the headset. Another copy of the code can be found on the headset itself, to the right of it, as well as underneath the headset.

Integration

One potential problem with the NOON VR headset is that it is very exclusive, and cannot be integrated with Google’s platforms. There are official iOS or Android apps that allow the headset to interface with mobile devices. The mobile itself will need to be nearly 5 inches long in order to sit comfortably and firmly inside the headset’s cradle. The app allows your phone to integrate itself with about five devices, which is really rather limited for a headset which demands you authenticate yourself just to get started. The headset does not integrate with a remote Bluetooth device, and instead uses a tap sensor that is unique to headsets manufactured by NOON.

Setting your preferences

When you first fire up the headset in VR, there’s an option that allows you to place the controls as per your own preferences. The initial menu allows you to calibrate the sensors as well, though you can always re-calibrate them whenever you wish. While this process may take a few moments, it’s well worth the time spent, as it considerably adds to the immersion of your VR experience.

The lenses tend to have no problems focusing, but there is a special focusing feature in the menu that can allow you to focus the lenses manually if necessary. The dock for the mobile opens up effortlessly, and it’s very easy to load the mobile in place and shut the doc. The mobile fits in very securely, which is always a concern with any mobile based headsets.

Firing it up

Fit the headset on to your head and adjust the straps to ensure that you have a snug fit. Choose your settings  in the initial menu, and you can get started right away. One of the best features of the NOON VR headset is that it can allow a user to use the storage capacity and processing power of a personal computer rather than the very much lesser capacity and power of a mobile phone. The fact that you can stream computer apps directly from the desktop makes this headset an extremely versatile one for either mixed reality or virtual reality. The company also has apps that can allow an entire family to watch the same movie as part of a shared experience.


Conclusion

The app integrated into the NOON VR headset is both an extremely positive point, as well as a slightly negative one. The positive aspect of the NOON VR app is that it allows you to integrate seamlessly with a PC, as well as to integrate different devices with the PC. The negative side of the app is that it does not allow you to access a lot of Google’s content, which those who have been Cardboard fans may not appreciate.

To be honest though, this slight drawback is completely negated by the fact that you can use PC apps seamlessly with the NOON VR headset. In fact, you use the Noon VR headset as a display device for your PC, for all practical purposes. Another very important plus point of the NOON VR headset is that its integrated tracking sensors can actually work to considerably reduce motion sickness. While the focus of the NOON VR headset seems to be geared towards playing movies, its ability to stream from a PC makes it an excellent reasonably priced choice for gamers, as well as for those who want to experiment with mixed reality.

Check out the best NOON VR PLUS deals on Amazon