
Sony has done very well in their advance into virtual reality. The design of their headset is by far the best and most user-friendly, as well as the easiest to ‘get out of the way’ when you want to return to the real world. This is in considerable contrast to devices like the Oculus Rift, in which a return to the ‘real world’ means removing the entire headset.
For those of you who love the power and versatility of the PC, Odd Sheep Games have developed a system of connecting a PSVR to a PC. The software that does this is called Trinus PSVR, and it opens gateways to a universe of possibilities. I’m sure you’re imagining some of those possibilities right now. In case you have problems with that, here’s a video to help you out…
Not only can you play PC games or your Steam library on your PSVR if you install Trinus PSVR, but you can watch VR movies on the headset as well, or 360 degree videos. If you own a PSVR, here’s how you can go about using Trinus to connect it to your PC.
Here’s what you’ll need to connect a PSVR to a PC
We’ll assume that you want to play Steam games. So you’re obviously going to need a Steam account, and SteamVR. You’re going to need the Playstation VR, of course, and you’ll need to download Trinus PSVR and then install it on your PC. Trinus PSVR comes with a free trial version. If you like it, you’ll have to buy the full version. It’s not very expensive, at around 15€.
Setting up the connection between the PSVR and the PC
Obviously, before you start to play, you need to get the physical setup right. It’s not difficult. You’ll need to connect the processing unit to the PC first. This is done with an HDMI cable. One end plugs into the processing unit’s PS4 HDMI port, and the other end will go into the PC’s HDMI port. You’ll also need a USB connection between your PC and the processing unit. You’ll need a USB to Micro-USB cable for this. The processing unit takes one end, and the other goes to the PC’s USB port.
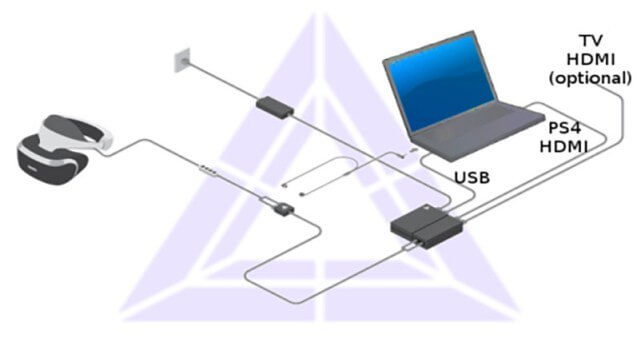
That’s the PC to processing unit part of the connection done. Now you simply plug the PSVR headset to the processing unit using the usual connections. Plug in the processing units power, and power up the setup. You’re good to go, as far as the hardware is concerned.
Setting resolutions
Trinus requires your monitor resolution at 1080p. Before you set the resolution, and do a few other necessary things, you need to ensure that the PSVR is powered up. Now, bring up the display settings on your monitor by right-clicking anywhere on your desktop. Select ‘Multiple Displays’, and select ‘Extend displays’. After this, in the Advanced Display Settings, select 1920 by 1080 for your screen resolution. Apply these settings, and your resolution and display have been set to be compatible with Trinus.
Setting up Trinus PSVR
You’ll have to configure Trinus first. To do this, you’ll need to right click the Trinus icon, and then run the program as an Administrator.
When the program opens up, you’ll find that one of the tabs is ‘Install’ – you’ll have to click this tab. When you do this, Trinus will search for – and find – the folder where you have installed Steam.
Once that’s done, click on one of the other tabs, marked ‘Main’. You’ll see a dropdown menu at the item PSVR Display. Click on it, and a list of displays will appear. You’ll need to click on DISPLAY1.
Now, just under that, is PSVR Mode, which also has a dropdown box. Click on that, and click on the option VR. There are other options here that can also be used. The Cinematic option is basically for watching movies, or playing 2D (as opposed to 3D) games in VR.
If you’re still confused, here is a step-by-step video to help you out…
Assigning some important controls
This is where you’ll also assign a key to reset your view in the PSVR if necessary. There’s a button right there in the Main Tab that says, simply, ‘Assign Key’ – just click on that, and then press a keyboard key to establish a shortcut that will reset the view for your PSVR if it becomes necessary.
There’s another important control you’ll want to set here. There’s a check box that allows you to use the mouse wheel to zoom in or out in-game. Just make sure the check box marked ‘Use Mouse Wheel’ is ticked, and this option will become available.

Calibrating the PSVR Headset
We’re almost done. All we have to do now is calibrate the PSVR headset. You’ll need to set it down on a perfectly flat surface. This is very important, so make sure you do this right. Start up Steam by right clicking on the Steam icon on your computer, and running it as Administrator. Now, in Steam, click on VR, and then on the option to ‘Run Room Setup’. Here you’ll need to select the option for ‘Standing Only’, and click on the button ‘Next’.
Now, click on the option that says ‘Calibrate Center’, and hit the button ‘Next’. The height calibration will come up next, where you simply have to enter your correct height. Next you’ll calibrate the floor – just follow the simple instructions on the screen, and hit ‘Next’. And then click on ‘Done’, and you’re good to go. Simply press the Windows key plus Shift plus the Right Arrow, and the headset display will immediately be visible on your PSVR, which will now operate pretty much like a Vive or Rift. Just fire up a Steam virtual reality game, and have fun on your PSVR.
A mouse, keyboard or other controller can be configured for individual games by bringing up the game’s window on your monitor display, and configuring the game’s controls there.
Common bugs with Trinus
Like all bridge-apps between two integrally different systems, there are minor things that can go wrong with a Trinus setup. Here’s how you can handle any bugs that crawl out of the woodwork when using Trinus…

Seriously, now, here’s how you deal with Trinus bugs…
Tracking problems and issues with drift
Issues with tracking or drift are the most common issues with Trinus, and can usually be linked to not following the installation process exactly. Just make sure that the headset rests on a stable and flat surface when you’re going through the setup and calibration process, and you won’t encounter these problems.
Getting the best clarity from your PSVR
There’s a slider in the main tab marked IPD that can help bring images into perfect focus in VR. Since you’ll have to see both the slider and the VR screens inside your headset to do this, you’ll have to hold your headset ‘half down’ so that you can see both your PC’s monitor and the screen displays inside your headset. A bit inconvenient, admittedly, but the clarity at the end of this process is well worth it. All you have to do is move the slider back and forth until the picture becomes perfectly clear.

It’s perfectly possible to use Trinus with your PSVR to play virtual reality games meant for the PC. This gives you the best of both worlds, since you can access programs made for both the PlayStation and the PC.