Home Blog Page 48

How to Play Echo Arena: Beginner’s Guide – Tutorial, Basics, Tips, Tricks & Tactics

0

Let me guess – you’ve finally decided to buy Echo Arena and have some fun with it. In the beginning, everything was fun and dandy, but you found yourself getting repeatedly smashed by the much more experienced opponents. Now, your goal is different – you want to get better at it! My friend, you’ve come to the right place.


Tutorial & Basics

In this beginner’s guide, we’re going to teach you how to play Echo Arena. Better. Once you’re done with the tutorial and are familiar with all the basics, come back here and pick up all the tips and tricks we’ve aggregated and prepared for you. By the time you’re done, you’ll be much better equipped to deal with the pro players.

All right, time for you to play that tutorial now. Don’t worry, we’ll still be here when you come back.


Done? Good.

Let’s quickly recap all the movement & controls basics

Touch Controllers
Button Action
BOTH “Grip” Grab
BOTH “Trigger” Fist
RIGHT “Thumbstick Click” Brake
LEFT “Thumbstick Click” Boost
RIGHT “B” Right Wrist Thruster
LEFT “Y” Left Wrist Thruster
RIGHT “Thumbstick Horizontal” Snap-Turn
LEFT “Thumbstick Horizontal” Snap-Roll(If enabled)
LEFT “Thumbstick Vertical” Snap-Pitch(if enabled)
  • GRAB – You will be using grab a lot. You can grab onto objects and players to fling yourself off of them. Obviously, you will have to grab the disc in order to, hopefully, score for your team.
  • BRAKE – From time to time, you will want to stop. The time required for a complete halt depends on your speed – the faster you go, the more time it will take for you to stop.
  • BOOST – Boosting makes you go forward fast in the direction you’re looking at
  • WRIST THRUSTERS – These can propel you individually, or provide an increased momentum when paired together. Usable for fine tuning your flight path.
  • SNAP-TURN – Keep this enabled if you don’t have a 360° setup. You can use it to do quick yaw-axis rotations (turning left & right)
  • SNAP-ROLL – this is disabled by default, but you can enable it if you find it beneficial to do quick roll-axis rotations. Being upside down to everybody is certainly useful in this game from time to time.

Lobby, Zones & Arenas

Now, before you jump right into the multiplayer arena to test your skills against other homo sapiens, you should take your time and familiarise yourself with the commands and movements explained above.

For that purpose, the Practice Arena and Combat Room are godsend. In the former, you can practice disc throws and getting accustomed to fine manoeuvring. The latter has your fists enabled, which helps you practice punching and disabling other players, as well as blocking with both hands.

Nevertheless, training yourself in these isolated zones can only get you so far. Once you feel ready, or just had enough of messing around in training zones, you will want to try out the real thing. Enter Echo Arena multiplayer map, where the real action resides.

The Arena

Echo Arena Top View
Top-Down Map of the Arena with labels
Blue side of the arena with labels
Screenshot of the blue zone layout with labels

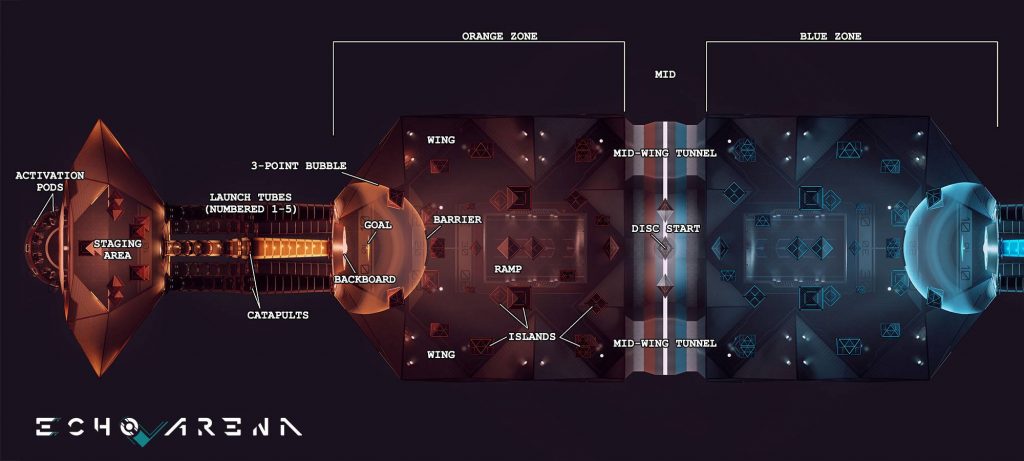
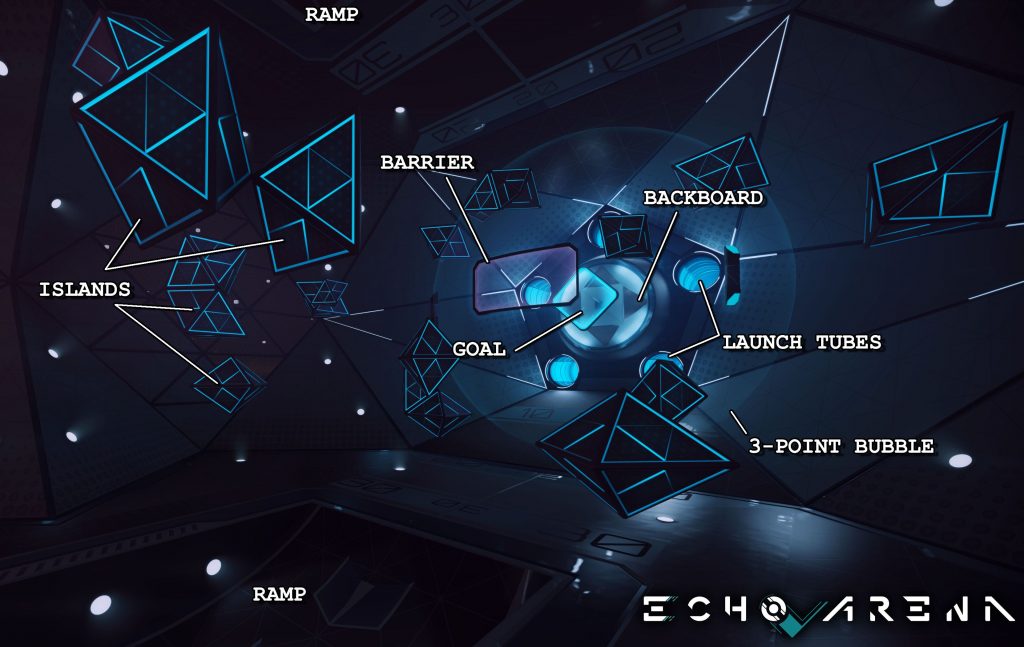
As you can see from the images above, the map consists of several zones, with each team starting from one of the two sides, orange or blue. Teams fight over the control of the disc. Scoring is done by throwing or “walking” the disc into the opponents’ goal.

Let’s get you familiar with the most important zones and parts of the Arena.

Activation Pods (Spawn Pods, Jack Pods)

This is the starting area. You spawn hear upon loading the map and every time someone scores the goal. After loading in, you will first have to pull the Release Lever. You won’t have to do it subsequently.

Staging Area (Match Lobby, Team Room)

This is the zone where you band together with your teammates while waiting. You can do some light practice here with discs, islands and dummy-bots. After both teams are full and ready, launch tubes barriers get unlocked for a 15-second countdown before the launch.
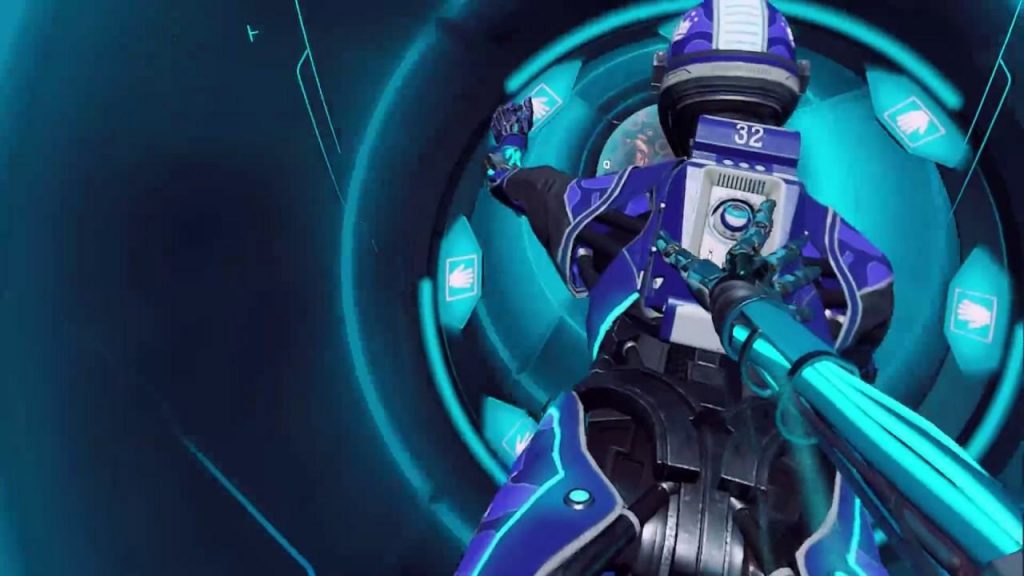
Launch Tubes

The five tubes are your entrances to the main Arena zone. They form a circular formation, with catapults inside.

Catapults (Launchers, Go-Fast Rings)

These are rings inside the tubes that get activated by passing your hand through the Launch button at their centre. You will then get propelled forward at 6 meters per second until you reach the end of the tube.

Backboard

Backboard is located in the middle of the launch tubes exits circle, right behind the goal. If thrown properly, the disc can actually ricochet off of backboard right into the opponents’ goal.

Goal

The goal has a transparent field inside its frame, floating in front of the backboard. When a disc passes through it, the attacking team gets 2 points. It allows for the disc to pass through either side.

Barrier (Guardian, Shield)

Barrier has a rectangular, curved obstacle floating right in front of the goal, outlining the front part of the 3-point bubble. The players can pass through it, but the disc will bounce off if thrown at or carried through it.

3-Point Bubble (3-Point Line)

Similar to basketball, any shots made from outside the 3-point bubble that end up passing the goal will give you 3 points instead of 2.

Ramp (Bank, Curve)

A concave part of the surface that can be found on the floor and the ceiling on both sides of the Arena. Due to the curvature, the disc ricochets off of it more predictably.

Islands (Stars, Polygons)

Floating triangular/pyramidal shapes equally scattered on each side of the Arena, both horizontally and vertically.

Disc (Cookie, Frisbee)

The “Holy Grail” of Echo Arena, the Disc is what both teams are ultimately fighting for. In order to score, the disc has to reach the opposing team’s goal.

The disc slows the holder’s max speed to 4.65 meters per second.

Holo Cubes (Bits, Juke-Boxes, Goalie’s Best Friends)

Fist-sized, transparent, cube-shaped objects grouped around goals and mid-wing tunnels. They let both players and the disc pass through, but when grabbed onto, they can be used for manoeuvring.

Echo Arena Slang

Knowing the movements, controls and names of map zones and parts will not be enough. You will have to know the specific terminology used by the Echo Arena players. Here’s a brief overview of some of the most common terms you may come across

Joust

This is a common term that describes the rush towards the disc once the staging timer reaches zero. Whichever team gets to the disc first has a clear advantage at the start of each rally.

Chain Launch

Echo Arena Beginner's Guide Tips Tricks Tactics Chain Launch
Grab onto the teammate in front and fling yourself off of him to achieve greater speed

Players grab onto each other in a chain formation. The player at the front uses the Catapult and the players behind can achieve greater speed by pushing off of him. This enables players to add up to 5 meters per second for each successful push-off, thus reaching the disc faster during jousting.

Clear

A term borrowed from other sports, a clear simply describes the action of flinging the disc as far away as possible from your team’s goal zone, mitigating the danger of another team scoring.

Juke

This term defines any instantaneous change in direction. This can be achieved by grabbing onto a wall, floor, island, cube or another player and using it as a platform to push yourself from. This can often throw of assailants off of your tail.

The Dream

Goals scored from significantly farther distances than usual. The Dream often starts as a simple clear which, through bounces and ricochets off of walls and islands accidentally ends up in the goal.
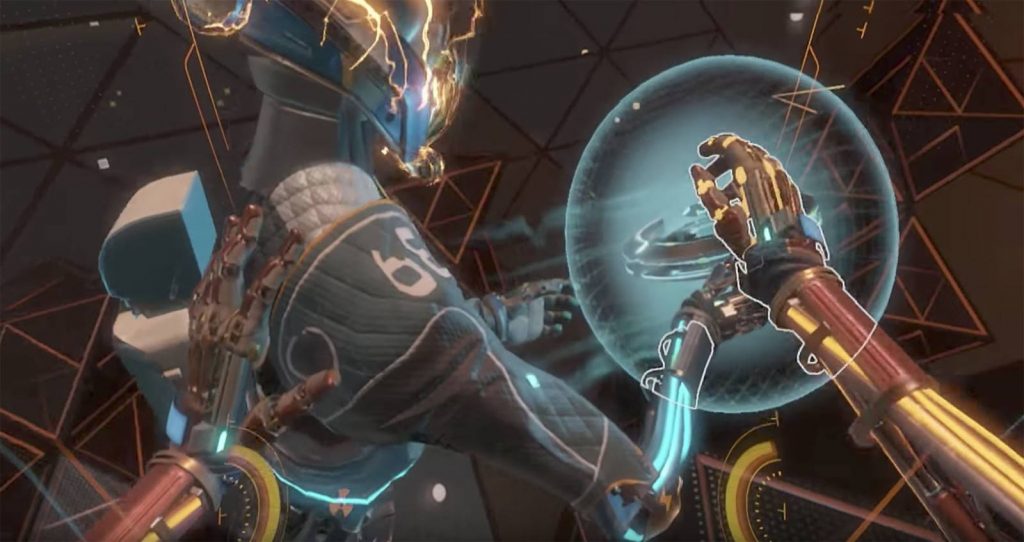
Punch Launch

With a myriad of synonyms such as Bop’n’Launch, Wombo Combo, Slammer Clamber, Slug’n’Tug, Boop’n’Scoop, Wham Bam Zam or Dish’n’Dash, punch launch has gained notoriety due to its effectiveness. Players of higher skill are capable of pushing themselves off of enemy players while simultaneously punching them, disabling them for the moment. It takes some practice to do this optimally, as a punch too soon will cause the player to lose momentum, while a punch too late won’t connect.

Advanced Tips, Tricks & Tactics

Knowing the movements, controls and lingo won’t be enough to somewhat level the playing field with players that have dozens, if not hundreds of hours of experience playing Echo Arena. We’ve compiled a list of a bit more advanced tips, tricks and tactics for you to use and abuse in the Arena. Here they are, in no particular order:

  • In the beginning, try to focus on punching enemy players as much as you can. As a level 1 player, your movement will look and feel clunky for a while. Trying to punch and disable enemy players is very effective at developing the feeling and muscle memory required to play the game, as you will often struggle to even catch up with them. Besides, being a constant annoyance that harasses the enemy team can help your teammates more than you fighting for the disc.
Echo Arena Beginner's Guide Tips Tricks Tactics Punch Disable
Punch to disable first, then rip the disc out of their hands
  • Holding the trigger on both controllers with your hands up will block incoming punches and disable the attacker instead. This can help you throw off the assailants in tight situations.
  • Never chase the disc. Instead, always try to predict where it’s going to end up and go there. In the meantime, keep punching your opponents.
  • If your teammate has the disc, don’t ever forcefully take it from him/her.
  • Wrist thrusters max speed goes up to 4 m/s. Boost goes up to 5 m/s. Use double boost quickly if you want to do 180° direction change.
  • If you have opponents on your tail and your teammates tell you to get rid of the disc, do it! It’s a team game, selfishness doesn’t win matches.
  • Holding the disc slows you down and disables your boost. You can counter this by chucking the disc downward into the floor and then catching up to it once it bounces back.
  • If everything else fails, try wiggling the disc around to make it harder for the enemy player to grab it out of your hand.
  • The disc conserves momentum, so if you’re flying to the side, you’ll need to counter this by throwing the disc a bit to the opposite direction in order for it to go straight forward.
  • Establish clear, respectful line of communication with your teammates. This is especially important during the joust. You will want to coordinate with your teammates to get to the disc before the enemy team by chain launching off of each other. Max attainable speed of chain launch for 3 players is 20 m/s, which is significantly faster than any of you can achieve on your own.
  • If a disc is contested by a bunch of players, don’t mindlessly get into the midst of it. Stay close though, if your team loses the fight, you’ll be ready to contest the disc immediately.
  • You can “walk” the disc using boosters. No need to immediately throw it once you have it. When you are reasonably far away from your opponents, you can “walk” the disc the whole distance to the goal. Be careful of the barrier though, you will be able to pass through it, but the disc won’t.
  • In order to stay in your designated play area, consider getting some kind of mat to stand on. Rotating on 1 foot will also go a long way against getting yourself tangled in cables, as well as preserving your walls, ceiling fans and TV sets.

The Best Star Wars VR Games and Experiences

0

Virtual reality and Star Wars fit together like bread and butter. The first thing any Star Wars fan ever wanted to do is to wield a lightsabre. As soon as VR tech started developing, we were patiently waiting for a title inspired by Star Wars.

Today, we have several Star Wars VR games available. While most of them aren’t VR compatible in their full length, there are few that will make you feel like a true Jedi!

Lightblade VR

The game is designed as a training simulation for using “lightblade” and is available on Oculus Rift and HTC Vive. Obviously, on the official Steam webpage, there is a disclaimer stating that “Lightblade VR” isn’t officially connected with Lucasfilm LTD.

While the game doesn’t have the official Star Wars license, it does a great job of making you feel like you are wielding a lightsabre. Of course, you need to have motion controllers in order to run the game. As you progress and get to more difficult levels, you’ll be able to unlock different colours of your “lightblade” and even use two at the same time. Your final test in this small and simple game will be a lightsabre battle against a Sith Lord.

Star Wars Battlefront Rogue One: X-Wing VR Mission

Many claim that this is by far the best Star Wars experience you can possibly have in a VR headset at the moment. It is exclusive for PSVR, and you can download it if you own Star Wars Battlefront. The mission is very short, but the content it offers perfectly depicts the Star Wars realm, and it can hardly get any better than that.

As the title says, you get to fly an actual X-Wing and enjoy a space fighter dogfight. The cockpit is designed with a lot of care for details, and almost every part of it is interactive, so you can inspect it and push the buttons before you fly off to the battle. The mission lasts for only about 10-20 minutes, but from the start to the very end it is extremely polished.

Trials of Tatooine

When Lucasfilm’s ILMxLab first announced the release of this game in 2016, the hype was at the all time high. In the end, it turned out to be just a tech demo, but it still offers a high quality Star Wars VR experience.

Game obviously lacks real depth as it lasts for only about 10 minutes. You won’t be able to make any choices, as they are already predefined for you. While the game is very short and limited, sounds and especially graphics are incredible.

Trials of Tatooine is just a free to play demo, but it perfectly shows how much potential Star Wars legacy has inside virtual-reality environment. We hope that this was just a teaser for some more ambitious projects in the future.

Star Wars Jedi Challenges

This is the big one to look forward to! Lenovo and Disney officially joined their forces and announced the release of Lenovo Mirage augmented reality headset, that is available for pre-order along with Star Wars Jedi Challenges for $199.99.

In the box you get a lightsaber controller (that’s correct), tracking beacon, Lenovo Mirage AR headset and all the additional equipment required to set the device up. Your lightsaber has three buttons on it, Power, Blade and Force. The developers announce lightsaber battles, but also some additional board-style games where you will act as commander against the Empire. Trailer looks promising, and we are just can’t wait to try out Star Wars Jedi Challenges!

Last, but not least, here are few honourable mentions.

SIMMPER 3D VR Headset Glasses with Headphones Review

0

Are you looking for that immersive experience from a virtual reality headset? With SIMMPER 3D VR headset glasses, you can’t go wrong. It lets you visit all the places you’ve always wanted, play games, make calls, and watch high definition videos. It’s adorned with all the functional features you would expect from a piece of hardware like this.

Features

SIMMPER 3D VR headset glasses are laid with top notch Japanese lenses. They provide a 120-degree viewing field at a 35mm focal distance. This offers the optimal way for VR immersion.

Better yet, the focal and pupil distances are adjustable. It helps customize your view by allowing people with 0-400 degrees hyperopia and 0-800 degrees myopia to change their imaging settings. There’s no need for glasses with this headset.

SIMMPER 3D VR Headset Glasses with Headphones Review FOV
Crystal clear image without glasses

Compatibility

To use it, you’ll just need to place your smartphone in it. SIMMPER 3D VR headset glasses are compatible with Android, iOS, and PC phone series. It is easy to set up, and there are plenty of VR apps out there to try on your phone. Google Apps are probably your best bet to start with.

The model comes with headphones, which is a huge plus. Your videos, visits to nature, gaming, and other outdoor activities will always be replete with the appropriate background sounds. The headphones boast a clean treble with a rich bass. The audio experience is nothing like you have had with other VR headsets in its class. Not to mention, it comes with all the right buttons where you get to control the volume, play, and pause movies.

SIMMPER 3D VR Headset Glasses with Headphones Review Headphones
Immersive sounds from the headphones will enrich your VR experience

Comfort

Wearing this device is a walk in the park. The adjustable straps are a remedy to prevent any pressing on your skin or around your eyes. It will fit your head and won’t bother you no matter whether you are standing, walking, or are seated. With adjustable interpupillary distance, you’ll never have to see figures as two separate entities through your eyes.

The comfortable design of SIMMPER 3D VR headset glasses has lot to do with is light weight. You can have it on for hours without any added strain on the head or the eyes. It has ventilations for the face and phone to prevent sweating or overheating of the phone. This measure preserves its life as it maintains the proper working condition. You can expect it to last long and still feel as good as new.

SIMMPER 3D VR Headset Glasses with Headphones Review Comfort
Even if you have the weirdest head shape, this headset will fit.

Price

This is not one of those VR headsets where you have to dig deep into your pockets to acquire it. In fact, the price is so attractive that it has become a popular buy among VR enthusiasts today. However, it does not have touch-enabled controllers where you can shake hands or walk in your virtual world.

SIMMPER 3D VR headset glasses are definitely good bang for the buck. Get yours today and immerse yourself in 3D VR.

The Best Rift and Vive Jumpscare Experiences to Show Your Friends and Family

0

If you haven’t watched your close and loved ones scream and cry with Vive or Oculus headset strapped on, you missed on loads of fun.

Without further ado, and in no particular order, here are best Rift and Vive jumpscare experiences to demonstrate VR horror to your friends and family

Spooky’s Jump Scare Mansion: HD Renovation


You enter the cutesy scare house. It starts off innocently, but rapidly escalates into full-blown terror. As you’re wandering through the rooms (there’s 1000 of them!) you will start getting attacked and chased by the most unspeakable stuff of nightmares.

A remake of original Spooky’s Jump Scare Mansion, it was developed in Unity engine with proper 3D graphics and models, as well as some new additions along the way.

It’s playable both on HTC Vive and Oculus Rift, but you will need the controller and keyboard for command input.

Make sure you never EVER find yourself without the camera – the jumpscares and screams of your friends & family will be absolutely hilarious, guaranteed!

PRICE: €/$ 9.99 on Steam

The Elevator Ritual


This Rift exclusive provides detailed instructions how to get to the Otherworld. You’re playing as Sarah, a teenage student who, obviously, follows these instructions, because logic, I guess?!

Apparently, nobody knows what’s there, and there is this mysterious woman that’s supposedly dangerous. Also, there’s some kind of vengeful spirit there. Somewhere…

The woman = vengeful spirit? Well, we’ll let you find that out on your own. Besides, we are not touching this thing ever again. Ever.

PRICE: €/$ 2.99 on Oculus

Alien: Isolation


In order to play this blast-from-the-past in VR, you’ll need Oculus Rift, Xbox Controller or Keyboard & Mouse combo, and an unofficial MotherVR mod. Alien: Isolation has a built-in prototype-Rift functionality, which many Rift users tried back in 2014, but it was never officially launched. It was just there, in the game files.

Well, what’s in the files can’t remain there forever. Reddit user /u/Nibre took what’s in there and made the aforementioned mod. The newest iteration of the mod now supports HTC Vive as well. He seems to be actively providing direct support and troubleshooting assistance for his work.

When it comes to the actual gameplay, Alien-levels of horror in VR are disturbingly visceral. After all, the modder himself warned us twice, in bold font and all caps:

“THIS GAME IS DESIGNED FOR SEATED PLAY. By playing this Mod any other way than seated, you do so at your own risk. You may be able to stomach this standing, but I absolutely cannot recommend it at this time”

That’s as clear of a warning as it can be. Be careful out there.

PRICE: €/$ 36.99 on Steam

The Bellows


Here’s an excerpt from this game’s Steam Page

“Taking the knowledge gleaned from the previous release, Castle Steps has created a polished horror experience designed to show people just how scary VR can be. The game has been redone with brand new content, new scares, and a singular focus. Scaring you, scaring your family, and scaring your friends. Plunge yourself into a world of nightmares and fear, and discover just how frightening virtual reality can be.”

One thing’s for sure – whoever subjects him/herself to this torture will have to pay a visit to the bathroom.

Best of all? It’s free to play. Enjoy. If that’s even possible.

Dreadhalls


This game is one massive dungeon filled with horrors that can’t wait for you to make a single wrong step. With no tools or weapons, the only objectives are to survive and escape.

Now, how good is this to showcase VR horror to your friends and family?

They will experience primal terror. They will scream. They will cry. You won’t be able to stop laughing.

PRICE: €/$ 9.99 on Steam

Monstrum


This game is a jumpscare heaven. You are stuck on a derelict cargo ship, trying to survive and escape by any means necessary.

The game is really hard. The odds are stacked against you. With procedurally generated environment and horrifying predators lurking in the shadows, you will be driven to the brink of sanity.

Perfect party game, for sure.

PRICE: €/$ 14.99 on Steam

Paranormal Activity: The Lost Soul


This game traps you in a normal looking house. Except, nothing in that house is really normal. Thus the name, heh…

Driving inspiration from PARANORMAL ACTIVITY movies, this game was developed exclusively for VR. Developers really made it as immersive as possible, which makes it even scarier.

Kudos to anyone who can play this through. Bonus points for surviving the terror living inside the house. We could do neither of those.

PRICE: €/$ 36.99 on Steam

Ghost Town Mine Ride & Shootin’ Gallery


Similar to Spooky’s Jump Scare Mansion: HD Renovation, this horror game starts off on a lighter, funnier note.

However, as you go deeper into the abandoned tourist attraction, you will quickly regret that decision. The tricky part, aside from the cold horror, is that you will actually have to aim and shoot if you want to make it out alive.

Although it’s playable on Rift, you will need 360° tracking, so if you plan on buying this, it’s time for that third sensor.

PRICE: €/$ 8.99 on Steam

Don’t Blink


Follow the green light, but don’t lose the sinister clowns out of sight. If you do, they’ll start chasing you. Get too close and you’re done!

This early access game is a jumpscare bonanza. It’s loosely based on Weeping Angels episode from Doctor Who.

Thing is, you will simply never get comfortable. Especially as your in-game character anxiously breathes around these laughing soul suckers.

It’s free to play, Vive only.

Emily Wants To Play


With a name like that, you simply know someone’s pants will end up wet.

The premise is based on a pizza delivery at 11 PM. You arrive at the destination, house looks sketchy as hell. However, it’s raining outside, so you enter through the open door. You really shouldn’t have, but it’s too late now.

Jumpscares abound, this game will make even the most cold-blooded killers cower in terror, screaming for their mommy.

Get it. Your friends & family will remember it.

Oh, and, shut the door. Just in case.

PRICE: €/$ 4.99 on Steam

When Will Mayweather VR Boxing Experience Come Out?

0

Although we’ve all been denied the chance to watch a live Mayweather vs. McGregor VR broadcast, virtual reality has always been a very boxing-friendly hobby. What better way to experience it than simulating punching somebody in the face, right?

Obviously, there are a couple of VR boxing games and experiences out there, but they’re all pretty basic. Mayweather’s VR boxing game will join this line-up sometime in January 2018. You will also be able to download an app on your smartphone and “train with Mayweather on the go.”

The venture into the smartphone & VR app market is part of Mayweather’s broader post-boxing career plan. The 50-0 boxing defence virtuoso will start a new worldwide business – Mayweather Boxing & Fitness. The home-gym location will open in Southern California some time during Fall of this year.

There are no details about Mayweather’s VR game available at the moment. Official website entices you to opt into their list to “learn more about the first ever boxing VR training experience.”

Judging by the franchising model in place, Mayweather Boxing & Fitness will be focusing on expansion both in the real world and in the cyber-space. Virtual reality, as an emerging market still in its infancy stages, offers unique opportunities for a wide range of businesses.

Mayweather Boxing & Fitness is no different. The strict boundaries separating traditional fitness and sports industry from the digital, online-based market are rapidly fading. A myriad of apps for each and every aspect of fitness & sports culture have de-facto become the norm nowadays.

For a business savvy guy like Mayweather, it makes sense to establish presence on your smartphone and in your VR headset. And since we’re talking about a guy who made more than $1 billion wearing gloves and “sculpting” people’s faces, the quality bar is set high. Hopefully, the VR experience will be available on all major VR platforms.