Let me guess – you’ve finally decided to buy Echo Arena and have some fun with it. In the beginning, everything was fun and dandy, but you found yourself getting repeatedly smashed by the much more experienced opponents. Now, your goal is different – you want to get better at it! My friend, you’ve come to the right place.
Tutorial & Basics
In this beginner’s guide, we’re going to teach you how to play Echo Arena. Better. Once you’re done with the tutorial and are familiar with all the basics, come back here and pick up all the tips and tricks we’ve aggregated and prepared for you. By the time you’re done, you’ll be much better equipped to deal with the pro players.
All right, time for you to play that tutorial now. Don’t worry, we’ll still be here when you come back.
Done? Good.
Let’s quickly recap all the movement & controls basics
| Touch Controllers |
Button | Action |
| BOTH | “Grip” | Grab |
| BOTH | “Trigger” | Fist |
| RIGHT | “Thumbstick Click” | Brake |
| LEFT | “Thumbstick Click” | Boost |
| RIGHT | “B” | Right Wrist Thruster |
| LEFT | “Y” | Left Wrist Thruster |
| RIGHT | “Thumbstick Horizontal” | Snap-Turn |
| LEFT | “Thumbstick Horizontal” | Snap-Roll(If enabled) |
| LEFT | “Thumbstick Vertical” | Snap-Pitch(if enabled) |
- GRAB – You will be using grab a lot. You can grab onto objects and players to fling yourself off of them. Obviously, you will have to grab the disc in order to, hopefully, score for your team.
- BRAKE – From time to time, you will want to stop. The time required for a complete halt depends on your speed – the faster you go, the more time it will take for you to stop.
- BOOST – Boosting makes you go forward fast in the direction you’re looking at
- WRIST THRUSTERS – These can propel you individually, or provide an increased momentum when paired together. Usable for fine tuning your flight path.
- SNAP-TURN – Keep this enabled if you don’t have a 360° setup. You can use it to do quick yaw-axis rotations (turning left & right)
- SNAP-ROLL – this is disabled by default, but you can enable it if you find it beneficial to do quick roll-axis rotations. Being upside down to everybody is certainly useful in this game from time to time.
Lobby, Zones & Arenas
Now, before you jump right into the multiplayer arena to test your skills against other homo sapiens, you should take your time and familiarise yourself with the commands and movements explained above.
For that purpose, the Practice Arena and Combat Room are godsend. In the former, you can practice disc throws and getting accustomed to fine manoeuvring. The latter has your fists enabled, which helps you practice punching and disabling other players, as well as blocking with both hands.
Nevertheless, training yourself in these isolated zones can only get you so far. Once you feel ready, or just had enough of messing around in training zones, you will want to try out the real thing. Enter Echo Arena multiplayer map, where the real action resides.
The Arena
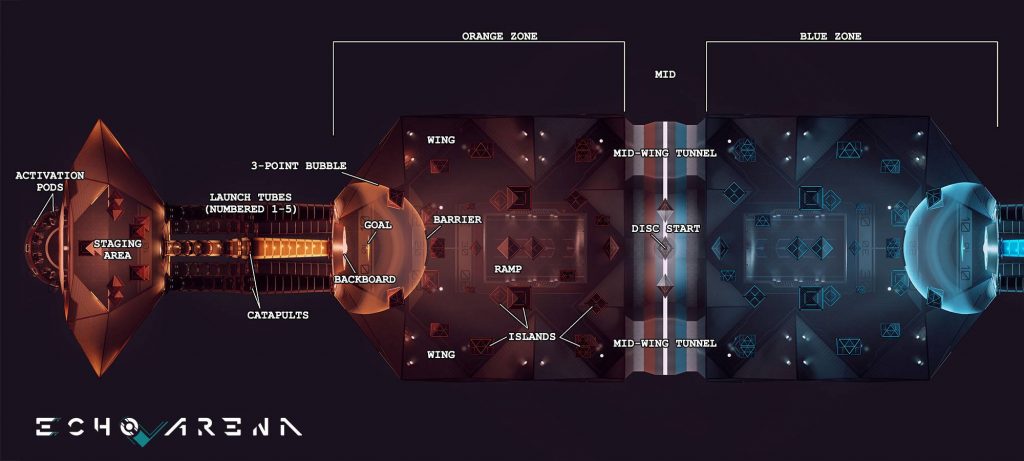
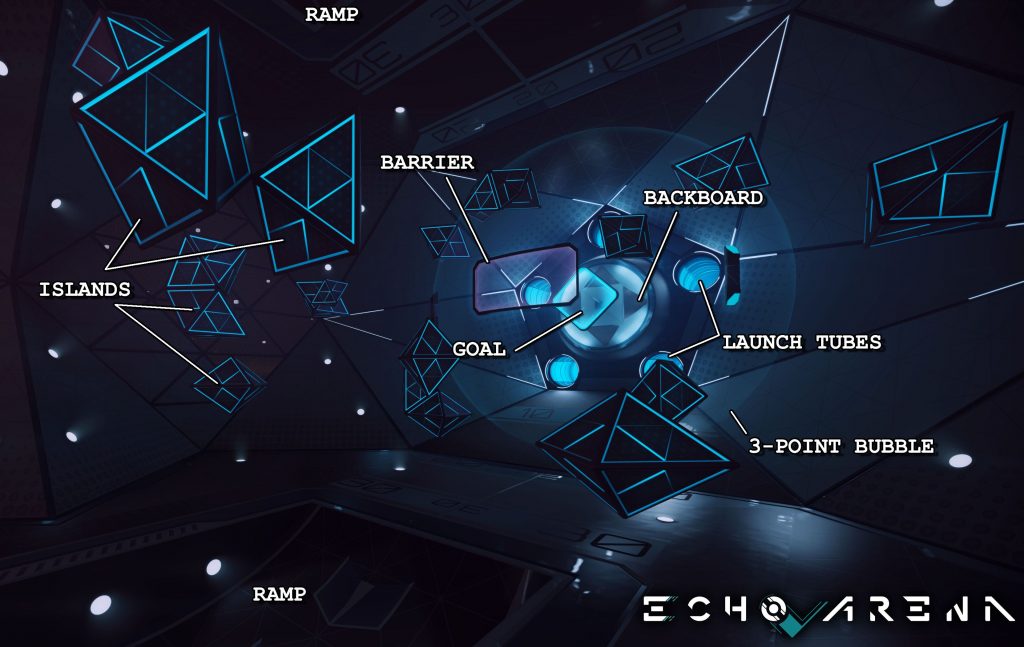
As you can see from the images above, the map consists of several zones, with each team starting from one of the two sides, orange or blue. Teams fight over the control of the disc. Scoring is done by throwing or “walking” the disc into the opponents’ goal.
Let’s get you familiar with the most important zones and parts of the Arena.
Activation Pods (Spawn Pods, Jack Pods)
This is the starting area. You spawn hear upon loading the map and every time someone scores the goal. After loading in, you will first have to pull the Release Lever. You won’t have to do it subsequently.
Staging Area (Match Lobby, Team Room)
This is the zone where you band together with your teammates while waiting. You can do some light practice here with discs, islands and dummy-bots. After both teams are full and ready, launch tubes barriers get unlocked for a 15-second countdown before the launch.
Launch Tubes
The five tubes are your entrances to the main Arena zone. They form a circular formation, with catapults inside.
Catapults (Launchers, Go-Fast Rings)
These are rings inside the tubes that get activated by passing your hand through the Launch button at their centre. You will then get propelled forward at 6 meters per second until you reach the end of the tube.
Backboard
Backboard is located in the middle of the launch tubes exits circle, right behind the goal. If thrown properly, the disc can actually ricochet off of backboard right into the opponents’ goal.
Goal
The goal has a transparent field inside its frame, floating in front of the backboard. When a disc passes through it, the attacking team gets 2 points. It allows for the disc to pass through either side.
Barrier (Guardian, Shield)
Barrier has a rectangular, curved obstacle floating right in front of the goal, outlining the front part of the 3-point bubble. The players can pass through it, but the disc will bounce off if thrown at or carried through it.
3-Point Bubble (3-Point Line)
Similar to basketball, any shots made from outside the 3-point bubble that end up passing the goal will give you 3 points instead of 2.
Ramp (Bank, Curve)
A concave part of the surface that can be found on the floor and the ceiling on both sides of the Arena. Due to the curvature, the disc ricochets off of it more predictably.
Islands (Stars, Polygons)
Floating triangular/pyramidal shapes equally scattered on each side of the Arena, both horizontally and vertically.
Disc (Cookie, Frisbee)
The “Holy Grail” of Echo Arena, the Disc is what both teams are ultimately fighting for. In order to score, the disc has to reach the opposing team’s goal.
The disc slows the holder’s max speed to 4.65 meters per second.
Holo Cubes (Bits, Juke-Boxes, Goalie’s Best Friends)
Fist-sized, transparent, cube-shaped objects grouped around goals and mid-wing tunnels. They let both players and the disc pass through, but when grabbed onto, they can be used for manoeuvring.
Echo Arena Slang
Knowing the movements, controls and names of map zones and parts will not be enough. You will have to know the specific terminology used by the Echo Arena players. Here’s a brief overview of some of the most common terms you may come across
Joust
This is a common term that describes the rush towards the disc once the staging timer reaches zero. Whichever team gets to the disc first has a clear advantage at the start of each rally.
Chain Launch
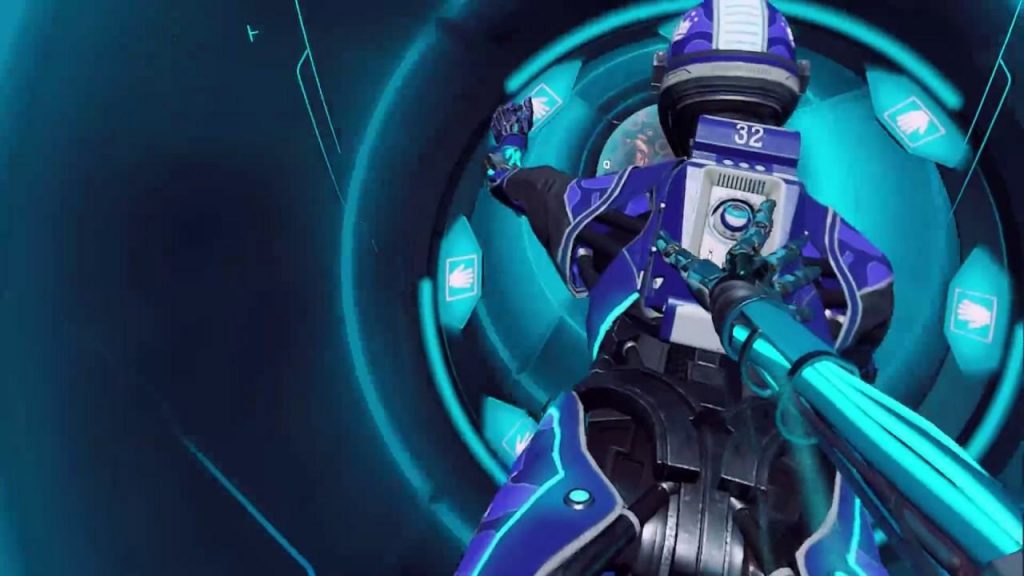
Players grab onto each other in a chain formation. The player at the front uses the Catapult and the players behind can achieve greater speed by pushing off of him. This enables players to add up to 5 meters per second for each successful push-off, thus reaching the disc faster during jousting.
Clear
A term borrowed from other sports, a clear simply describes the action of flinging the disc as far away as possible from your team’s goal zone, mitigating the danger of another team scoring.
Juke
This term defines any instantaneous change in direction. This can be achieved by grabbing onto a wall, floor, island, cube or another player and using it as a platform to push yourself from. This can often throw of assailants off of your tail.
The Dream
Goals scored from significantly farther distances than usual. The Dream often starts as a simple clear which, through bounces and ricochets off of walls and islands accidentally ends up in the goal.
Punch Launch
With a myriad of synonyms such as Bop’n’Launch, Wombo Combo, Slammer Clamber, Slug’n’Tug, Boop’n’Scoop, Wham Bam Zam or Dish’n’Dash, punch launch has gained notoriety due to its effectiveness. Players of higher skill are capable of pushing themselves off of enemy players while simultaneously punching them, disabling them for the moment. It takes some practice to do this optimally, as a punch too soon will cause the player to lose momentum, while a punch too late won’t connect.
Advanced Tips, Tricks & Tactics
Knowing the movements, controls and lingo won’t be enough to somewhat level the playing field with players that have dozens, if not hundreds of hours of experience playing Echo Arena. We’ve compiled a list of a bit more advanced tips, tricks and tactics for you to use and abuse in the Arena. Here they are, in no particular order:
- In the beginning, try to focus on punching enemy players as much as you can. As a level 1 player, your movement will look and feel clunky for a while. Trying to punch and disable enemy players is very effective at developing the feeling and muscle memory required to play the game, as you will often struggle to even catch up with them. Besides, being a constant annoyance that harasses the enemy team can help your teammates more than you fighting for the disc.
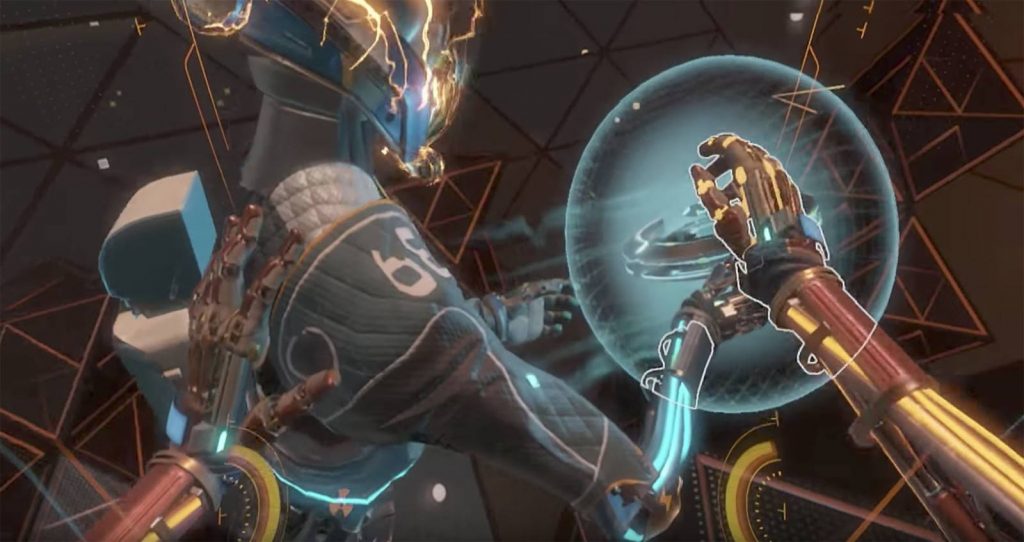
- Holding the trigger on both controllers with your hands up will block incoming punches and disable the attacker instead. This can help you throw off the assailants in tight situations.
- Never chase the disc. Instead, always try to predict where it’s going to end up and go there. In the meantime, keep punching your opponents.
- If your teammate has the disc, don’t ever forcefully take it from him/her.
- Wrist thrusters max speed goes up to 4 m/s. Boost goes up to 5 m/s. Use double boost quickly if you want to do 180° direction change.
- If you have opponents on your tail and your teammates tell you to get rid of the disc, do it! It’s a team game, selfishness doesn’t win matches.
- Holding the disc slows you down and disables your boost. You can counter this by chucking the disc downward into the floor and then catching up to it once it bounces back.
- If everything else fails, try wiggling the disc around to make it harder for the enemy player to grab it out of your hand.
- The disc conserves momentum, so if you’re flying to the side, you’ll need to counter this by throwing the disc a bit to the opposite direction in order for it to go straight forward.
- Establish clear, respectful line of communication with your teammates. This is especially important during the joust. You will want to coordinate with your teammates to get to the disc before the enemy team by chain launching off of each other. Max attainable speed of chain launch for 3 players is 20 m/s, which is significantly faster than any of you can achieve on your own.
- If a disc is contested by a bunch of players, don’t mindlessly get into the midst of it. Stay close though, if your team loses the fight, you’ll be ready to contest the disc immediately.
- You can “walk” the disc using boosters. No need to immediately throw it once you have it. When you are reasonably far away from your opponents, you can “walk” the disc the whole distance to the goal. Be careful of the barrier though, you will be able to pass through it, but the disc won’t.
- In order to stay in your designated play area, consider getting some kind of mat to stand on. Rotating on 1 foot will also go a long way against getting yourself tangled in cables, as well as preserving your walls, ceiling fans and TV sets.
